Gordon Myers
Articles on Life, Truth, Love, Computers, and Music
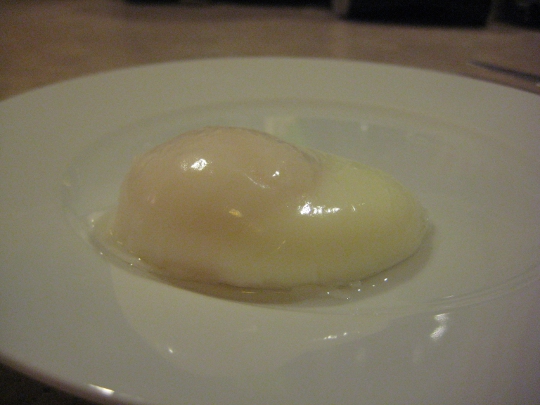
The Ten Egg Challenge: Part 5
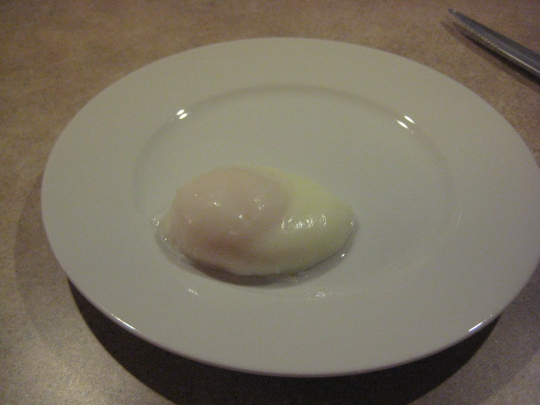
Day 5: Hard Boiled
On day 3, I remarked that scrambled was the easiest style of egg because you pretty much can't screw it up even if you wanted to. Hard boiled comes in a marginally-close second for ease. I have to admit that hard boiled eggs have never really been my favorite. I know that some people swear by them, and certain hotels even feature them as a staple of their continental breakfasts. But to me, hard boiled eggs just aren't a breakfast food. They're more of an add-on to other, real foods in my book. I cut them up and put them in my salads and casseroles, for instance. But on their own, they've never done it for me. And I have to admit I've always enjoyed the white part more than the yolk, even though I know the yolk is where all the protein is at.
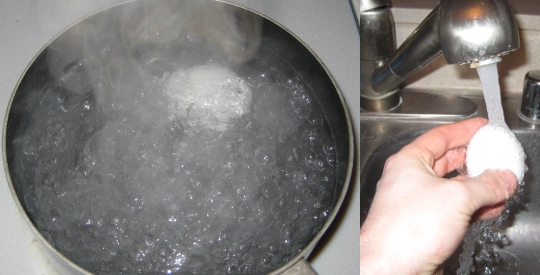
Here's what you'll need to cook a hard boiled egg:
- A pot full of boiling water,
- A pair of tongs (or just a spoon), and
- An egg
Seriously! That's all you need! While the other cooking styles call for things like butter, milk, and even vinegar, all that you need to make a hard boiled egg is an egg and water. Heat the water to bubble, bubble, toil, and trouble temperatures, then drop your egg in - gently, laying it down in the pot using your tongs. You obviously do NOT want any type of boiled eggs to crack. Then just wait. A good 12 to 15 minutes will do - so you want to make sure that your pot is large enough so that the water won't completely evaporate away over the course of 15 minutes. Then, when the time's up, take the pot off the burner, use your tongs to extract the egg from the water and put it somewhere else while you dispose of the water. Then, take the egg in your hand and (quickly) run it under a constant stream of cold water. Do this long enough so that egg cools down to a temperature that's comfortable to hold without burning your hand. This will halt the internal cooking process of the yolk and blah blah technical food stuff. Then, when it's cool enough to hold onto, give it a quick-but-firm tap on the top, and then just peel the eggshell away. Voila!
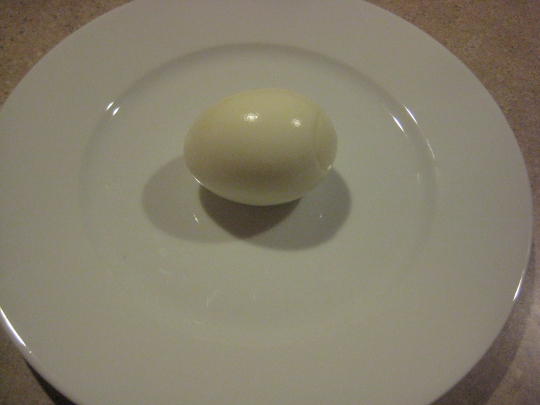
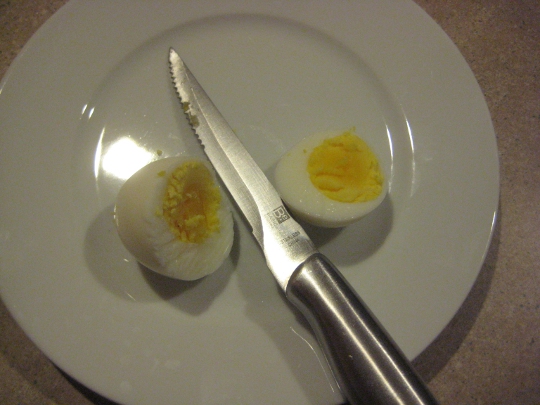
The results were exactly what I expected: a hard boiled egg. I would be in trouble if after 27 years of Western living I didn't know what a hard boiled egg tasted like. And as I said before, they don't do it for me as a standalone food. I'm giving it a 2 out of 10. I did add salt to the yolk tonight, and that certainly helped, as salt has a way of making anything better. And I'm not trying to imply that it's a bad taste, per se; I just prefer many of the other styles over this one. And I feel like I could make hard boiled eggs with two arms tied behind my back, so while I was preparing this egg I had a couple other things comprising my dinner cooking simultaneously on the stovetop. And Emerald was "helping" me cook tonight while I prepared this egg, too. For awhile she was dwelling in the secret place of the most cat (aka hiding in the cupboards).
I picked a quick-and-easy style tonight because again I was busy. I have a somewhat regimented weekly schedule (I've actually been working on making it more regimented): on Wednesday nights at 7:30 PM, I attend the church service over at First Church of Christ, Scientist, Madison. Tonight's service had readings about Jesus' birth; it was very Christmassy. At every Wednesday service, anyone in the audience (whether they're a church member or not) has the opportunity to stand up and speak a "testimony." A testimony is simply an expression of gratitude for how God has been working in your life, giving specific examples. Often people talk about challenges and struggles overcome. I'm actually one of those standing up to praise God myself a lot of weeks at these services. So if you, dear blog reader, are in Madison, I'd love to have you join me for a service on Wednesday night! There's also an online form that allows people to submit their remarks in advance, to be read for them by someone else during the service (once screened). While no one has actually used this form yet, I think that's still nice to have. Sometimes it's easier to talk about things when you're "anonymous," and sometimes you just can't be there in person!
Lastly, if you've been following this challenge, you know that I was lamenting my poor egg-flipping skills last night with over easy. Well I've thought of an idea that should help me quickly improve. The only spoiler I'm going to give is that it is pink. Tune in tomorrow to see which kind of egg I cook up next. The challenge is already halfway done, and that is eggcellent. (Groan... well admit it, you knew I had to make that pun sooner or later.)
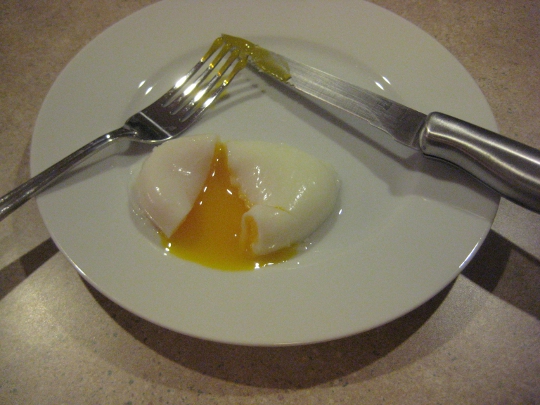
The Ten-Egg Challenge: Part 4
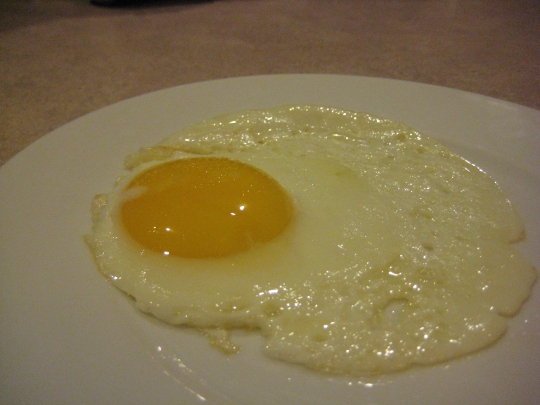
Day 4: Over Easy
Tonight I tried another style that I had never tried before. I learned a few things tonight. I learned that over easy is basically the same as sunny side up, except with one extra flip (which leads some people to refer to this style as "sunny side down"). And I also learned another lesson tonight: I am bad at flipping eggs. At least, for now. Right now I'm trying to type up this post super fast before I have band practice. More on that later.
To cook an egg "over easy," here's what you'll need:
- A frying pan,
- A spatula,
- Some butter, and
- An egg
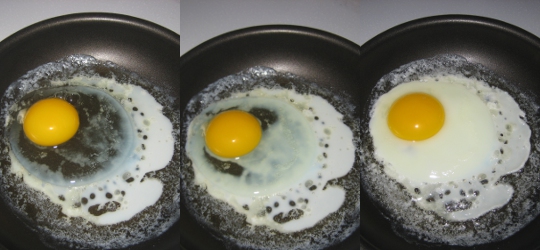
Grease the pan with copious amounts of butter and make sure it spreads around well. Heat the burner to a medium heat. Then just crack an egg in and wait! The waiting takes about two minutes or so - just until the egg whites have solidified. As you can see I have a diagram pictured above, showcasing an egg that is not ready for a flip, then almost ready, and finally ready. Once it reaches the point where the whole of the whites are opaque (but the yolk is still bright yellow), you want to give it a flip. I've seen that the master chefs do this without a spatula - they actually just flip the egg up into the air using the pan and then catch it flawlessly. Since I'd never cooked this way before, and since I was in a rush, I didn't even attempt that. I just used a spatula. And I used a spatula poorly, as you can see below.
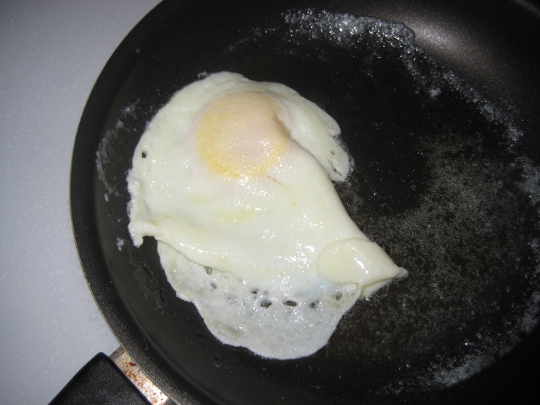
Once the egg has been flipped, don't touch it. Even if you did a miserable flip job like I did, resist the temptation to fix it, otherwise you might break the yolk. Just wait another 45 seconds for the bottom to cook over, and then using your spatula, remove it from the pan, flipping it back to its original orientation, and onto your serving plate. When cut open, the yolk should still be nice and runny. You can probably already guess two additional styles I'll be trying later on in this challenge: over medium and over hard. The fact that the whole yolk is still runny distinguishes this style from those.
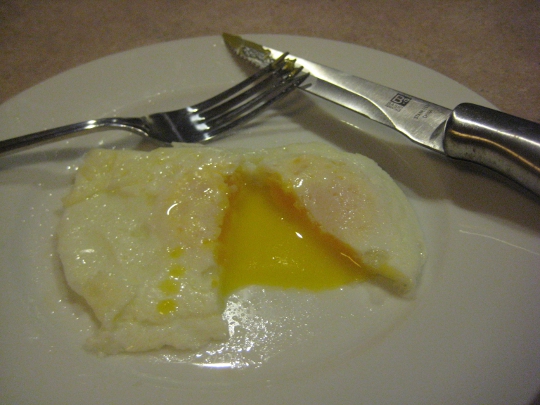
The results? Well, even though my egg may not have been the most aesthetically pleasing due to my presently poor egg-flipping abilities, it was extremely pleasing to my taste buds! In fact, I really wanted to make another one right after I finished this one! But, alas, I had to hold off, as I promised myself to use exactly 12 eggs for this challenge - no more, no less. I'll give this an 8 out of 10. Plus, I'm in a bit of a rush tonight because it's Tuesday, and on Tuesday nights I have band rehearsal. I play French horn in the Verona Area Concert Band, which is really a fantastic little group, run by conductor and Verona Area High School band teacher Eric Anderson. Our next free concert will be on Thursday, February 7th at the Verona High School, so if you're in the area, come check us out! I'm off to practice now; check back tomorrow to see which style I cook next!
The Ten-Egg Challenge: Part 3
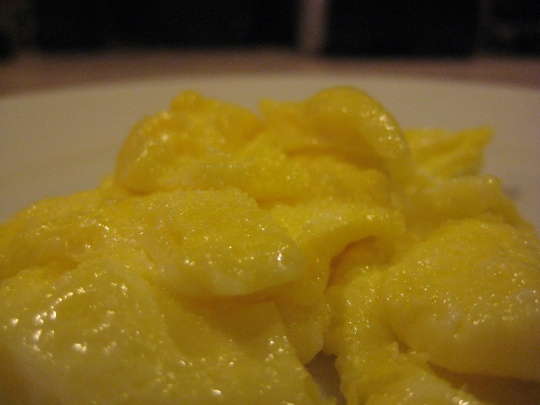
Day 3: Scrambled Egg
Most of the eggs I'll be making for this challenge are done in ways that I've never attempted before. Scrambled is not one of those ways. I've done scrambled eggs many, many times before and I have a method to it to ensure they turn out perfectly. Of all the different styles, scrambled eggs get cooked the most and there's really no way to screw them up.
Here's what you'll need to cook them:
- A bowl,
- A whisk (or a fork),
- A spatula,
- Some butter,
- Some milk,
- A frying pan, and
- An egg
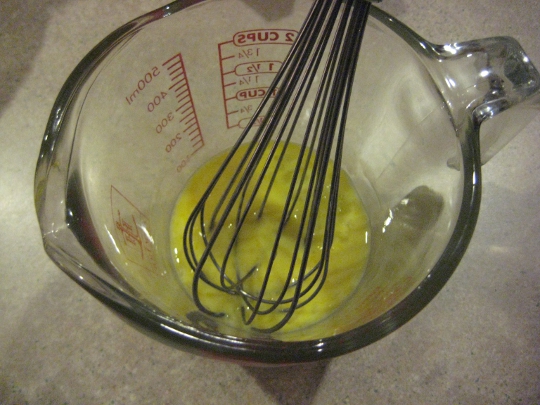
Because I only did a single egg, I used a measuring cup in lieu of a bowl. I like my eggs mixed up with milk because I think it gives them a lighter and fluffier texture. So begin by cracking your egg(s) into the bowl and adding in 1 tablespoon (or less) of milk per egg. Use the whisk to mix them all together until the color is consistent throughout. Grease the pan with butter (again I used copious amounts of butter - as a former roommate used to say to me, "the secret ingredient is butter") and set the burner to a medium-high or even high heat. Pour the egg-milkxture into the pan and let it sit there for about 1 or 2 minutes. Then perform a litmus test by prodding the side with a spatula. You just want to check if the bottom has solidified. The top is going to be bubbly and liquidy no matter what, but the bottom should harden up. Once it's hard enough to be flipped, flip it. Flip it good. (Cu-rack that egg!) Use the spatula to chop it up into bits, and flip the bits as necessary. Some people like to keep the egg in way too long until it actually starts to brown. That's way too long. I prefer my scrambled eggs still light and fresh, so as soon as all the liquidy parts are gone, it's done. Then just take the pan off the burner and slide it onto a plate!
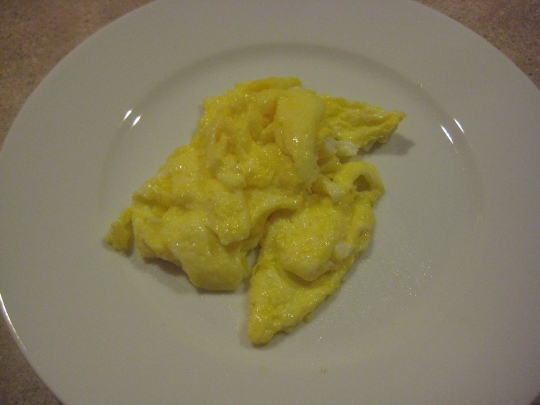
Scrambled eggs are my favorite, so of course the results were magnanimously delicious. As usual, I added salt to taste. Although, I have to admit that I really did enjoy that poached egg on Day 1, so perhaps by the end of this challenge I'll have some new favorites. Still, I'm doubtful that anything else can truly dethrone scrambled as king of the egg-cooking styles. One thing I should mention: because I mix my eggs with milk before scrambling them, you sometimes get white spots. That's okay, and is to be expected. As you can see in the photos, there really weren't any major white spots this time, but then I used a little less milk than I sometimes do.
One of the reasons I picked scrambled tonight was because I was rather busy this evening (not that I'm not any other evening...) and they're a time-tested method for me that is quick and simple. My plans for the evening included typing up this post while listening to a live audio podcast called Every Day's a Celebration, and then watching the newest episode of a TV drama I'm addicted to. The online podcast was based heavily on an online, ecumenical project called Radical Acts. If you're not already familiar with Radical Acts, it's a program designed to encourage each of us to live Jesus' teachings more fully in our daily lives. Check it out!
Anyways, despite the fact that I got this post typed up and then lost all of it thanks to a browser glitch, and despite the fact that they canceled the latest episode of REVOLUTI![]() N so they could air "Blake Shelton's Not-So-Family Christmas" instead - two things that could otherwise ruin a perfectly good evening (okay, so perhaps "ruin" is exaggerating a bit) - these eggs were still good enough that I wasn't phased at all (well, maybe I was a little phased. I mean Blake Shelton? Really?). The only thing that could have made them better is bacon. Actually, to be precise, a breakfast consisting of a scrambled egg, a single piece of buttermilk toast, some strips of bacon, and a glass of orange juice is pretty much ambrosia in the morning. I know I said I would be coming back through these posts after completing the challenge to rank them, but I'm already going to give scrambled eggs a solid 10 out of 10.
N so they could air "Blake Shelton's Not-So-Family Christmas" instead - two things that could otherwise ruin a perfectly good evening (okay, so perhaps "ruin" is exaggerating a bit) - these eggs were still good enough that I wasn't phased at all (well, maybe I was a little phased. I mean Blake Shelton? Really?). The only thing that could have made them better is bacon. Actually, to be precise, a breakfast consisting of a scrambled egg, a single piece of buttermilk toast, some strips of bacon, and a glass of orange juice is pretty much ambrosia in the morning. I know I said I would be coming back through these posts after completing the challenge to rank them, but I'm already going to give scrambled eggs a solid 10 out of 10.
Check back tomorrow to see which style is next!
The Ten-Egg Challenge: Part 2
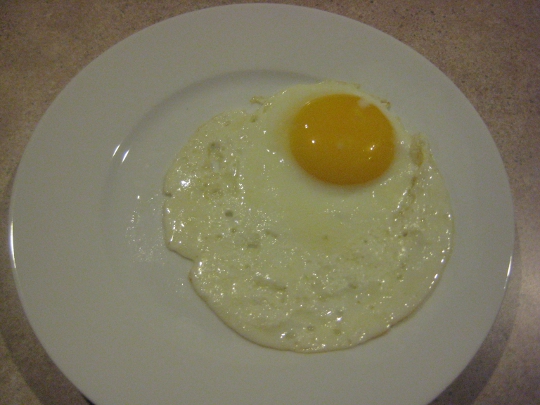
Day 2: Sunny Side Up
I'm continuing on with my Ten-egg Challenge with what is probably the most basic of all egg styles: sunny side up. But despite its ease to make, this is another style that, prior to today, I had never made before! And as I understand it, this style provides the foundation for a number of other styles I'll be trying out. Here's the completed egg:
To make this type of egg, you will need:
- A frying pan,
- A little bit of butter,
- A spatula, and
- An egg
Grease the pan with butter - I actually used copious amounts of butter here, but that's not so bad - and heat it up on a medium heat, making sure the butter gets spread on the whole pan. Then just crack the egg and drop it in!
It doesn't take very long to cook an egg sunny side up, so you have to watch it carefully. I've heard that certain restaurants actually refuse to serve eggs this way because, of all the different styles, this borders the closest to serving raw egg. Of course you can leave it in the pan for longer to ensure it gets cooked better, but then there's also the risk of burning it on the bottom. On my very first try, it turned out perfectly. It wasn't too hot or too cold like the big or mid-sized bears, but cooked "just right," as Goldilocks says. It almost wasn't, though! At one point when I thought it looked ready, I softly touched the yolk and, lo and behold, it was still cold. Thankfully it's not rocket science, and obviously a cold yolk is not going to be something you'd want to eat. So... I let it continue cooking for another minute or two, before sliding it out of the pan with a spatula.

The results? Decent - but not my favorite. Not by a long shot. The egg whites were good, the yolk was nice and runny (but still cooked), and I added salt, as usual, because I like salt a lot. But I don't think I'll be ordering sunny side up eggs nor making them for myself any time soon. I'm giving this style the lowest score of all: 1 out of 10. It was edible but it didn't wow me. Still, now if someone else were to ask me to make sunny side up eggs for them, I would be able to comply and not look like a fool in the process! And that is a good thing; it's good to be prepared.
I made this egg this evening, just before writing this post and just after enjoying a chicken dinner. So I wonder if my disinclination to really get into this style was just the protest of the egg's mother on my taste buds? Honestly, it probably could have been improved if I knew anything about seasoning. But anyways, I've now successfully eliminated vegetarians from my blog readership! Mission accomplished. Tune in tomorrow to see which kind of egg I cook next. And I promise I'll start fulfilling the sub title of this blog soon by actually blogging about things other than food.
The Ten-Egg Challenge: Part 1
Hello world! After taking a several year hiatus from blogging, I'm back, but perhaps not with a vengeance. You may notice that my website looks nothing like it used to. For that, we have my good friend and coworker, Kristi Trefftzs, to thank. So a HUGE thank you to her!
Recently I was watching an episode of "Master Chef" where they had a challenge to the hopeful cooks to prepare an egg in four different ways: poached, sunny side up, soft boiled, and a 3-egg omelette. While some of the hopefuls were still relatively young, the masters insisted that anyone serious about cooking should know how to do eggs in all sorts of different ways by now. That got me thinking. I'm 27, and I've never cooked eggs in any of the ways they had called for in that challenge.
So, I'm setting out to fix this in what I'm calling the 10 Egg Challenge. This is a challenge that spans 10 days and should use exactly 12 eggs - assuming I don't break any. I'm going to challenge myself to learn 10 different styles of cooking eggs, and I'm going to chronicle my journey here on my blog.
Day 1: Poached Egg
This is something I'd never done before, and it's really not that hard. Admittedly, I suspect I'll probably be typing "it's really not that hard" every day of this challenge. But, you never know until you try it yourself. On every day of this challenge, I'm going to explain how to prepare the egg in this way. But before I do that, allow me to showcase a photo of the finished, poached egg:
To make a poached egg, you will need:
- A pot full of water,
- 1 or 2 teaspoons of white vinegar (can be white wine vinegar or rice vinegar),
- A bowl,
- A slotted spoon, and
- An egg.
You want to make sure to fill the pot well, so that it's not too shallow; the egg needs some room to swim around in. Bring the water to a boil, and then immediately reduce the heat to a medium, or even low, simmer so that's it not bubbling any more. Then add your teaspoon(s) of vinegar. I didn't actually measure this; I just guessed. It doesn't need to be a precise science. But one thing to note: do not add any salt to the water! It will ruin the whole process if you do. Crack the egg into a bowl first (do not drop it directly into the water!), then hold the bowl just over the surface of the water so you can gently drop the egg in. Watch the egg. It should be fine on its own, but you can use the spoon to try to corral the whites around the yolk. But be gentle! You do not want to puncture anything.
I found a number of websites that said you should keep the egg in the water for no more than 3 to 4 minutes. I kept mine in for about 5 or 6, though I may have used a slightly lower heat than others. Just watch it. Throughout the process, I would periodically take the spoon to lift the egg from off the bottom of the pan, still keeping it submerged in the warm water. After about four minutes, I gently picked it up with the spoon, out of the water, and lightly tapped it with my finger just to see if it was done yet. It wasn't. Thankfully I was gentle enough to not damage the egg, but I could tell it was still somewhat fragile at that point. After another minute or two, I tested it again, and it was more solid (though it still had some spring - which is good!). So at that point I turned off the burner, and used my spoon to pull it out of the water and onto a serving plate. There was an outermost perimeter of "messy" whites surrounding the inner solid whites. I used a knife and trimmed those off and threw them away, leaving only the perfectly formed poached egg.
The results were delicious. The yolk was nice and runny, the egg whites tasted great, and I added the perfect amount of salt. I'm giving Poached Eggs a solid 9 out of 10. And in case you've ever wondered how to make "eggs benedict," you now know how. Eggs benedict is just an English muffin with ham and a poached egg (and usually Hollandaise sauce as well). So there you have it! So far I'm really liking this challenge. Check back tomorrow to find out what style of egg I'll make next!
Major Updates
My website is going through some major updates! Check back here over the next couple weeks as I actually start blogging again. ")

 Page 6 of 6
